
Stubbing out RhinoCommon and Grasshopper Assemblies for Python
This article is specific to the PyCharm python editor. If you figure out how to get the same results with a different editor, please let me know and I’ll update this blog post.
Recent versions of PyCharm support python stub files. Stub files provide information about the classes and methods available in a module along with parameter and return types without actual implementations. This is great news for Rhino and Grasshopper scripting as those module implementations are written in .NET and are something that typical python editors don’t know how to work with.
I wrote a simple application that chews through .NET assemblies and generates python stub files. You can find this project at https://github.com/mcneel/pythonstubs. The repository also contains the resulting stub packages for RhinoCommon.dll, Grasshopper.dll, GH_Util.dll, and GH_IO.dll. This application is not Rhino specific so you should be able to use it for other .NET assemblies that you want to “stub out” for python.
Now the fun part
- Start PyCharm and create a new “pure python” project
- Go the the settings for the project
- (Windows) File menu -> Settings…
- (Mac) PyCharm menu -> Preferences…
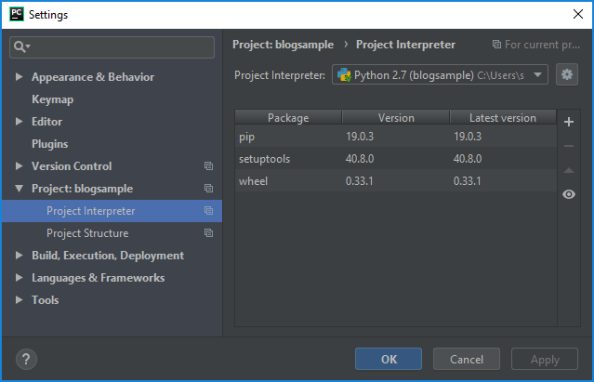
- Go to the Project Interpreter settings as shown below
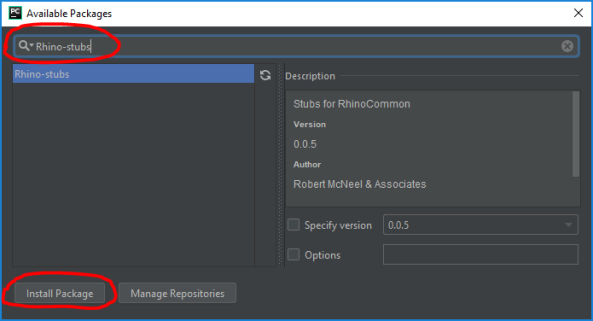
- Click on the plus (+) button. In the “Available Packages” dialog search for and install the Rhino-stubs package. This will install the Rhino stubs as well as all of the Grasshopper stubs
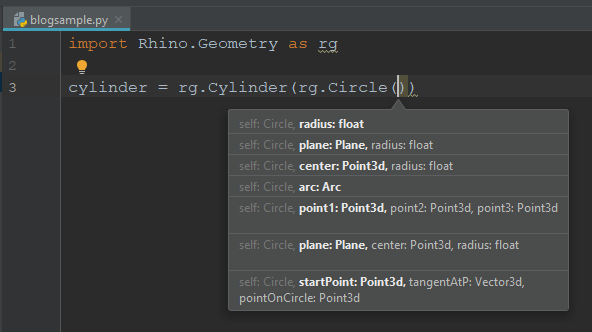
- Create a new python file and import a module like Rhino.Geometry. That’s it! Enjoy autocomplete for all of RhinoCommon and Grasshopper while editing your script
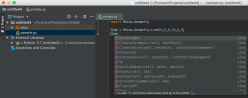
NOTE: This works for PyCharm on both Windows and Mac. The above screenshot was from Windows. Here’s a screenshot from Mac showing autocomplete: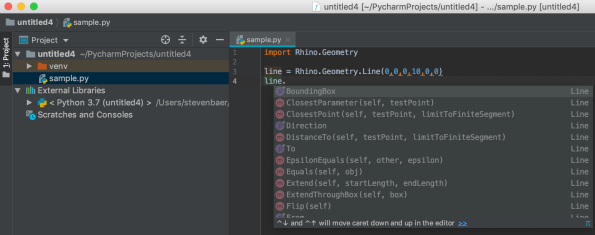
You may be familiar with Rhino3dmIO; our .NET assembly to provide a geometry library with 3dm file import/export capabilities. Rhino3dmIO is a trimmed down version of RhinoCommon that wraps the OpenNURBS (C++) toolkit and works independent of Rhino. It is available on most platforms through nuget.
Rhino3dmIO can be used on its own or as a “fat client” for the compute.rhino3d web service. By “fat client” I mean that many typical geometry operations can be performed efficiently in the client application while operations like meshing of polysurfaces, trimming, and intersections can be completed through calls to compute.rhino3d.
This all works great…. as long as you are working in .NET and on an operating system that nuget packages are available for.
rhino3dm – two new flavors
I’m excited to announce that the .NET version of Rhino3dmIO now has two new siblings, a native CPython library and a javascript (web assembly) library. Both libraries are built under a single public github repo at https://github.com/mcneel/rhino3dm. We dropped the “IO” suffix from the name since you can do a lot more than just file IO and are calling these libraries rhino3dm.
rhino3dm.js is a javascript library with an associated rhino3dm.wasm (web assembly) that is OpenNURBS plus additional C++ to javascript bindings compiled to web assembly. Web assembly is now an available technology on all major browsers as well as node.js.
rhino3dm.py is a python package that is OpenNURBS plus additional C++ to python bindings compiled to a C-extension library that can be used on all current versions of CPython (both 2.7 and 3.7) and is available on all platforms through PyPi.org
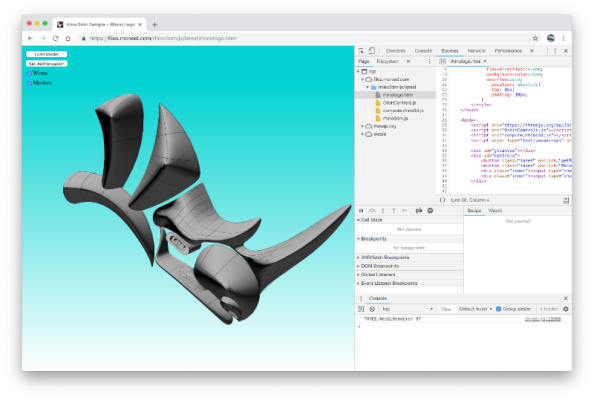
Here is one example scenario. The following screenshot is a 3dm file viewer available in the samples on the github repo. The html+javascript to create the viewer is around 300 lines (including comments) and runs on all browsers including mobile devices. rhino3dm.js is used to read a 3dm file and create an instance of a File3dm class in the browser’s memory. It then walks through the objects in the model and calls compute.rhino3d.com to create meshes and isocurves for the polysurface. These meshes and isocurves are then added to a three.js scene for display.
The libraries are still very new and changing rapidly. Give them a try or get involved with the github repository and help make them even better.
These are exciting new technologies and the possibilities that they open up are beyond my imagination. A bunch of my coworkers will be in New York in a couple weeks to talk about this at the AEC Tech 2018 event. Stop by if you get a chance.

We finally have improved editor support for Mac Rhino python scripts using the Atom editor!!!
I would recommend this as the editor of choice if you are writing python scripts for Mac Rhino. Give it a try and give us some feedback to help improve it.
As a follow up to my post about the new features in ghPython, I wanted to point out another feature now available; running Grasshopper components outside of the Grasshopper canvas.
You will need to have installed ghPython and have used the component in grasshopper at least once. We will fix the “at least once” issue in a future release of ghPython.
- Start Rhino
- Run EditPythonScript and enter the following script
import rhinoscriptsyntax as rs import ghpythonlib.components as ghcomp import scriptcontext points = rs.GetPoints(True, True) if points: curves = ghcomp.Voronoi(points) for curve in curves: scriptcontext.doc.Objects.AddCurve(curve) for point in points: scriptcontext.doc.Objects.AddPoint(point) scriptcontext.doc.Views.Redraw() - Run the python script
ghpythonlib (both components and parallel) modules are available in the standard python editor in Rhino. Behind the scenes things are running through Grasshopper code, but you don’t have to use a canvas to do your work.
This also lets you work in a slightly different way where you can get points in Rhino using rhinoscriptsyntax “get input” type functions and pass those points (or curves or breps) into the Grasshopper component code.

Just in time for Christmas… ghPython 0.6.0.3 was released this week and it has two new features that I’m really excited about.
A little background
David Rutten was visiting the McNeel Seattle office in November to discuss future work on Grasshopper and Rhino. When David is in town it always gives me the chance to brainstorm with him and try to solve some of the features that users ask for. Two features that we commonly hear about are “how can I do what X component does, but through RhinoCommon/code?” and “how can I improve performance on my computer with many CPUs?”
Out of these chats came the two major new features in ghPython 0.6.0.3; the ability to call components from python and an easy way to do this using multiple threads. ghPython 0.6.0.3 ships with a new package (ghpythonlib) that supports these two new features.
Components As Functions (node-in-code)
There is a module in ghpythonlib called components which attempts to make every component available in python in the form of an easy to call function. Here’s a sample to help paint the picture.
import ghpythonlib.components as ghcomp

# call Voronoi component with input points
curves = ghcomp.Voronoi(points)
# call Area component with curves from Voronoi
centroids = ghcomp.Area(curves).centroid
Notice that the above sample is just three lines of script (and two lines of comments to help describe what is happening.)
 Here is a sample gh file

Of course you can mix in other python to perform calculations on the results of the component function calls. I tweaked the above example to find the curve generated from Voronoi that has the largest area.
import ghpythonlib.components as ghcomp

curves = ghcomp.Voronoi(points)
areas = ghcomp.Area(curves).area
#find the biggest curve in the set
max_area = -1
max_curve = None
for i, curve in enumerate(curves):
    if areas[i] > max_area:
        max_area = areas[i]
        max_curve = curve
Remember, this can be done for almost every component in Grasshopper (including every installed add-on component.) I use the term almost because there are cases where the function call doesn’t make sense. These cases are for things like Kangaroo or timers where the state of the component is important between iterations. Fortunately this is pretty rare.
Along with the new functionality that this provides, I also found myself simplifying existing gh definition files by simply lumping together a bunch of related components into a single python script.
Use those CPUs
Along with components is another module in ghpythonlib called parallel. This module has a single function called “run” which takes a list of data as input and a single function that should be called for each item in the list. What the run function does is call this function on as many threads as there are processors in your computer and then properly collect the results so you get a list of return values in the same order as the input list. The return value is whatever your custom function returns. I could show how this is done with the previous samples, but those already run so fast that there is no need to attempt to multithread them. Instead I put together a sample that typically takes around a second to complete on my computer; slicing a brep with 100 planes.
import ghpythonlib.components as ghcomp
import ghpythonlib.parallel

#custom function that is executed by parallel.run
def slice_at_angle(plane):
    result = ghcomp.BrepXPlane(brep, plane)
    if result: return result.curves

if parallel:
    slices = ghpythonlib.parallel.run(slice_at_angle, planes, True)
else:
    slices = ghcomp.BrepXPlane(brep, planes).curves

In the above image I’m passing the variable called parallel into the python script with a value of false. This makes the code execute on a single thread and as you can see by the profiler that the performance is the same in the python script as it is just using the BrepXPlane component (which is expected.)
Now when I toggle the input parallel variable to a value of true, the parallel.run function is executed. This function calls my custom slice_at_angle function 105 times, each time passing in a single plane and all on multiple threads. On my computer with 4 CPUs the execution time drops from one second to 313 milliseconds! A 3X speed boost by just adding a couple lines of script.

Give this new build of ghPython a try. I’m sure there will be questions and probably a bug or two to fix, but it gets fun pretty fast once you get the hang of it.
Downloads for this article
 Sample 1
![]()
For the last few months, we’ve been moving our online support forums from a ton of independent sites to a single discourse server with multiple categories for each product. We hope this will let us better communicate with our customers by giving them a single location where a their questions can be rapidly answered by a large audience of both McNeel employees and other expert users.
Unfortunately (for us), discourse is not yet a simple turn-key online service that we can simply turn on and let whomever we are paying make sure things continue to run smoothly and all of the parts are up to date. Discourse is constantly being worked on with new features or bug fixes based on the feedback users of our site and other discourse sites are providing the discourse team. It is exciting to see these changes show up every week, but in order to make sure we are constantly providing service to our users we need to come up with a few processes.
This post describes our process for upgrading our server to use the latest code from discourse.
First, I should note that we use Amazon EC2 for our server and that we are currently using an instance size of m1.medium which appears to be running pretty smooth for the current load of users on our site. The server was set up using the configuration defined here
STEPS
- Figure out if you need to update It is a good idea to look at the version number on the admin dashboard every once in a while. If you notice that the running version is old, it’s time to update.

- Log on to the Amazon EC2 management console
- Bring up “Under Construction” Server

We have a small web server that only displays the this image for any request. This server is named “Discourse Under Construction” in EC2. Find this server by going to the Instances tab and make sure it is running. If it isn’t running, right click on the server and click on the “start” option.
One the server is running, click on the “Elastic IPs” tab and find the entry for “54.277.248.2”. This is where discourse.mcneel.com requests go to. Right click on that entry and select “associate” and then select “Discourse Under Construction”.
Try reloading discourse.mcneel.com until you see the under construction page. - Clone the current production server
Go to the “Instances” tab on EC2 and find active “discourse” server. Right click on it stop it. Once the server is stopped, right click on it again and select “Create an Image (EBS AMI)”. This will save an image that of the server in it’s current state so we can launch a new instance with this state. I stopped the server first for paranoid reasons to make sure nothing is in a transient state that doesn’t make sense when saving. This may not be necessary, but I don’t know enough about the inner workings of EC2 to make that judgement.Once the image has been created, go to the AMIs tab, right click on the image that you just created and select launch to bring up a clone of the production server.- set instance type to M1.Medium
- name the instance based on the version you plan to update to. Use the version number of the latest discourse to name the instance. For example, the image in step one shows version 0.9.6.1 as the latest version available. In this case, name the instance “discourse_0_9_6_1”
- for keypairs and security groups, use the discourse ones
- Update the clone
Once the new server has been launched, test it by going to the public url for the server that Amazon allocated. You should see the discourse site with the latest content and you won’t be logged in (because this is a new server.)
Log onto the server by right clicking on the instance and select “Connect” (make sure user name is ubuntu and use our discourse private key.)These instructions are based on the updating discourse instructions with a few tweakssudo su - discourse bluepill stop bluepill quit cd discourse git checkout master git pull git fetch --tags #git checkout latest-release #where latest-release is the most recent tag. I usually just look at #https://github.com/discourse/discourse/releases and use the latest #version tag. At the time of this writing, I would enter git checkout v0.9.6.1 #Check sample configuration files for new settings #see the section on this on the "updating discourse" page #This is something I need to learn more about since I don't know quite #what to do when new changes appear # this could take some time. get a cup of coffee bundle install --without test --deployment # this is generally fast RUBY_GC_MALLOC_LIMIT=90000000 RAILS_ENV=production rake db:migrate # EDIT: since we are using multisite configuration now, need to perform the following RAILS_ENV=production bundle exec rake multisite:migrate # this could take some time; try walking off that cup of coffee RUBY_GC_MALLOC_LIMIT=90000000 RAILS_ENV=production rake assets:precompile #make the hostname discourse.mcneel.com exit sudo pico /etc/hostname #edit the file so the content is discourse.mcneel.com #also change the hostname without rebooting sudo hostname discourse.mcneel.com sudo su - discourse #COPY THE FULL LINE, NOTICE THE SCROLLBAR IN THIS WINDOW? RUBY_GC_MALLOC_LIMIT=90000000 RAILS_ROOT=~/discourse RAILS_ENV=production NUM_WEBS=2 /home/discourse/.rvm/bin/bootup_bluepill --no-privileged -c ~/.bluepill load ~/discourse/config/discourse.pill exit exit #shut down the shell application
Test the site by
- visit the site in your browser
- log in
- look at the dashboard on the admin page
- if everything is working, you’ll get a message that says everything is up to date

- Test
Reboot the clone using the EC2 console and make sure it is still working after a reboot - Make the clone the new production server
Click on the “Elastic IPs” tab and find the entry for “54.277.248.2”. Make the freshly updated server what this IP is associated with - Turn off the “under construction” server no need to pay for this server when it isn’t needed


I realize this is a bit overkill and plan on updating the process once I’ve gained a bit more confidence in it. We should be able to
- Create the AMI
- treat the AMI as the backup
- upgrade the running instance without bringing up a clone
This should reduce the “out of service” time, but baby steps first:)
![]()
MonkeySpace (http://monkeyspace.org/) is the only conference I make sure to go to every year. This was my third year attending and it was just as good as ever. It is a group of smart and friendly people who share an interest in promoting the concept of open source .NET projects. I would highly recommend going if you get a chance.
One thing that I really get out of this conference is an idea of what technologies I should spend a little more time learning. So many new technologies come out all of the time that you just can’t learn them all and actually get your active work projects done. Of course all of these projects have a .NET slant, but hey it is one of the primary frameworks we use at McNeel (along with C++ and python).
There were a ton of things that I learned about, but I boiled things down to a list of potentially rhino related topics that I need to learn more about this summer.
Here’s my personal summer reading list:
- Reactive Extensions (Rx) http://msdn.microsoft.com/en-us/data/gg577609.aspx
I didn’t quite get why people were excited about this, but I’m sure it was because I just didn’t understand it’s purpose yet. Needless to say, there was enough mention of Rx that I need to figure out what it is used for. - async/await in .NET 4.5
Conceptually, I understand what async and await are used for and I think it is going to be a standard part of a .NET developers toolkit from now on. I just haven’t personally sat down and used this in practice, so I don’t have a deep understanding of the technique yet. - nuget (http://www.nuget.org/)
Nuget is the package manager that ships with VS2012 and is also an open source project. We absolutely need to get projects like the stand alone version of RhinoCommon (Rhino3dmIo) packaged and available on nuget in order to make developing with RhinoCommon as pain free as possible.
Another part to nuget that we should explore is to potentially re-purpose it as a package manager for Rhino plug-ins. I want to type something likerhinoget selcommands
and have my selcommands plug-in downloaded and installed for Rhino
- netduino
arduino boards that can be programmed with .NET. This looks really fun. - Extending Xamarin Studio
I was able to steal a bit of Michael Hutchinson’s time (he knows all when it comes to extending Xamarin Studio) and after talking to him I’m pretty sure we can make a great experience for developers writing Rhino plug-ins on Mac.
I also think we could use Xamarin Studio as a remote debugger for python scripts on Mac; now that would make quite a few Rhino.Python scripters happy. - TypeScript and angular.js for javascript development
http://www.hanselminutes.com/373/a-desktop-developer-moves-to-the-web-with-mark-rendle - Being a better open source project maintainer
Phil Haack (http://haacked.com/) and several other speakers gave great presentations that made me feel that I just haven’t gotten projects like RhinoCommon to a level where it needs to be. I want to make it easy for people to use RhinoCommon and potentially contribute to it to improve it as a geometry toolkit. Here were a few things that I need to think more about.- Make sure the landing pages for projects like RhinoCommon and Rhino.Python describe what they are useful for instead of focusing on the programming details. These details can be on “sub” pages.
- Give commit access to people who have submitted pull requests
- Make the license clear for our projects so people can use them without concerns (http://haacked.com/ has a good tool for this)
- Create bugs/feature requests that are not too difficult to implement, but don’t implement them yourself right away. This gives people a chance to begin participating if they want to.
- Simplify the developer setup. Once it is simplified, try simplifying even more. This really should be worked on for RhinoCommon plug-in development.
- blog, blog, blog, wiki, wiki, wiki. Write things down and take time to put good effort into the content.
Wow, it has been almost two years since my last blog post.
Why has it been so long? Well… one reason is that I was pretty sick and tired of our old vbulletin server that we used for hosting Rhino.Python forums (and my old blog.) It just always felt like it was in a holding pattern waiting to be replaced by something better. Guess that was true since we’ve now switched over to discourse (http://discourse.mcneel.com) as our discussion platform. I couldn’t be happier with how discourse is performing as a place to bring a bunch of Rhino related conversations together.
but… discourse is not a blog engine.
That’s fine, I don’t think the guys at discourse need to start rolling all of these content management system features into their software. Let them focus on doing what they do so they can do it really well. I looked around for a while at the blogging systems out there and decided to have my blog running on wordpress (it also didn’t hurt to know that David Rutten is using wordpress and I’m sure he spent time making sure the blog had all of the features he wanted.)
So far all I’ve done was migrate the old vbulletin blog posts over here, but I’m already liking what I’m seeing from this blogging engine.
There are so many nice little features of python. Here’s a good one to learn; the sorted function.
sorted(iterable[, cmp[, key[, reverse]]]) – http://wiki.python.org/moin/HowTo/Sorting/
This function takes a list and returns a sorted version of the list. That’s nice…… but I wouldn’t write a blog post about this if that was all this function does. Here’s what I really like about the sorted function, the optional key argument. This argument lets you define a function that tells the sorted function what to use to compare different entries in the list.
I recently attended a Rhino python workshop and a student with a background in RhinoScript was putting together a python script that sorted a bunch of curves based on the Z height of each curve’s start point. This isn’t necessarily hard to do, but it does involve quite a few lines of script to write the sorting routine, and you can potentially write very slow scripts if you aren’t careful about your sorting algorithm.
Here’s how this script could be written in python using the sorted function along with the key parameter. The function asks you to select a bunch of curves and then adds text dots to the start point of every curve sorted by the curve’s start point Z height
import rhinoscriptsyntax as rs

def curvekey(curve):
    point = rs.CurveStartPoint(curve)
    return point[2]

def SortCurvesByZ():
    curves = rs.GetObjects("Select Curves", rs.filter.curve)
    if not curves: return
    sorted_curves = sorted(curves, key=curvekey)
    for i, curve in enumerate(sorted_curves):
        point = rs.CurveStartPoint(curve)
        rs.AddTextDot(i+1, point)

if __name__=="__main__":
    SortCurvesByZ()
Here’s a breakdown of what is happening.
- GetObjects is called so that the user can select a bunch of curves
- Once we a list, we call the sorted function passing the curves and using the named parameter of key=curvekey
- sorted() goes about its job of sorting the list, but since the key parameter was set it knows to call the curvekey function to get a value to use for comparison when sorting.
- We defined curvekey as a function that takes a single input parameter. This is what the key parameter in sorted is expecting; a function that takes a single parameter and returns some sort of value that it knows how to compare. curvekey is called for every item in the list and we return a floating point number (the z height of the start point). The floating point number returned is what sorted uses to compare each item’s “value”
- sorted returns a new list of curves that are now in sorted order. We just walk through the new list and add text dots so we can see that things are working.
Pretty darn useful function to keep in your python toolbox!
Disclaimer: I have very little experience with numpy and scipy so you are going to do better by searching google for support with these libraries. This blog is about getting these libraries to run in Rhino.
Yes it is possible now!!!
Okay, here’s what I did to get numpy/scipy running in Rhino
1 – Install Rhino 5 (32bit version)
numpy/scipy uses C++ DLLs which need to be compiled for a specific platform. Currently numpy/scipy for IronPython will only run in 32bit applications on Windows. I contacted the guys at Enthought and they do plan on releasing a 64bit version for Windows, but they want to make sure everything is working on 32bit first. They have some doubts about being able to release a mono version for you Mac guys out there.
2 – Install numpy/scipy for IronPython
Follow the instructions on this site http://www.enthought.com/repo/.iron/
3 – Modify settings in RhinoPython
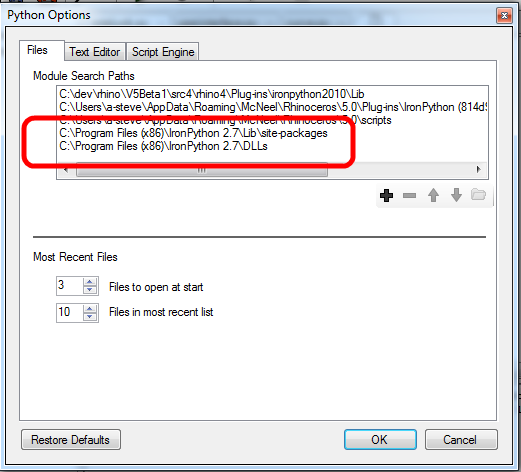
Start Rhino 5 – 32bit version and run “EditPythonScript” to bring up the editor. Go to the options dialog by selecting Tools->Options from the menu
Add site-packages and DLLs to the search paths (see image). This helps RhinoPython find the numpy/scipy packages and associated DLLs.
Check the “Frames Enabled” option since numpy/scipy requires this to be turned on.

I decided to make the “Frames Enabled” an optional engine feature since it does have a performance impact on scripts. Numpy/scipy requires this feature to be turned on.
4 – Run a test
# For now, we need to manually load mtrand before using numpy or scipy
# I'm still trying to figure out why mtrand is not automatically getting
# loaded when numpy/scipy imports it.  If I can fix this, we won't need
# the following two lines
import clr
clr.AddReference("mtrand")

import numpy
import rhinoscriptsyntax as rs

x_coord = [  0,  1,  2,  3,  4,  5,  6]
y_coord = [0.0,0.1,0.5,2.5,2.5,2.5,4.0]
xyz = zip(x_coord,y_coord,[0]*len(x_coord))
rs.AddPoints(xyz)

degree = 5
eq = numpy.polyfit(x_coord, y_coord, degree)
fitfunc = numpy.poly1d(eq)

fit_points = []
for i in range(61):
    x = i/10.0
    y = fitfunc(x)
    fit_points.append((x, y, 0))
rs.AddPolyline(fit_points)
If you get a polyline in rhino fit through a series of points then you are all all set; if not go back to step 1 and repeat.
This looks like a good place to start if you want to learn more about numpy/scipy
http://docs.scipy.org/doc/
